
“Galinstan” is an alloy of Gallium, Indium, and Tin.
The eutectic mixture is 68.5% Ga, 21.5% In, 10.0% Sn, and is liquid at room temperature.
The name Galinstan is a trademark of German medical equipment company “Geratherm”. It was developed as an environmentally friendly alternative to mercury for use in glass thermometers. The original patent is DE10321843A1 and dated 2003:

Despite this trademarking of the most common liquid gallium alloy; gallium based liquid metal was not new in any way.
With regards to semiconductors and computing, the earliest mention of using gallium based liquids as a TIM (Thermal interface material) for semiconductor cooling was in US4323914A, filed by IBM in 1979.
This patent cites a 1976 technical bulletin, which is summarized as follows:
“Circuit Module with Gallium Metal Cooling Structure” by D. A. Jeannotte, IBM Technical Disclosure Bulletin, Vol. 19, No. 4, September 1976, page 1348:
“The chip, the other electrical components on the substrate, and the flange are covered with a thin dielectric layer. Gallium metal is located in the space between the dielectric layer and the heat sink. Gallium melts at the normal operating temperature of the module and it forms a good heat transfer path from the chip to the heat sink” – US4323914A page 8 of 13

While this early evidence which establishes the premise of using a liquid metal TIM for electronics, the earliest release of liquid metal TIM aimed at consumer electronics was in 2005. In the second quarter of that year, Coollaboratory of Germany released their “Coollaboratory Liquid Pro” gallium based liquid metal.
So what are the advantages of using gallium-based liquid metal alloys as a TIM?
- Significantly higher thermal conductivity compared to thermal paste/grease
- Better adhesion to small surface imperfections, increasing effective area
Despite this, the many cons of liquid metal historically outweighed the pros for most mass produced electronic products:
- Electrically conductive: permanent damage via short circuits if not contained
- Difficult to apply: requires extensive cleaning and brushing to fully wet contact surfaces
- Material compatibility: incompatible with aluminum, will alloy over time with copper
- Nickel plating is highly recommended to prevent alloying and subsequent “drying”
For the longest time, regular thermal paste was sufficient. While paste has well understood shortcomings such as pump-out, oil separation, and high viscosity, the performance and longevity of a “good” paste was sufficient for most of the computing products on the industrial and consumer market.
Despite this, recent advances in semiconductor processes have posed greater thermal challenges for widely available computer products.
Lets look at quick list of Nvidia graphics cards in the high performance/enthusiast market segment, between 2006 to present (early January 2025):
| Release Date | Model | Process size | Transistor Count/Density | TDP (Thermal design power) | Theoretical Performance FP32 |
| Q4 2006 | 8800 GTX | 90 nm | 1.4M / mm² | 188 Watts | 345.6 GFLOPS |
| Q2 2008 | GTX 280 | 65 nm | 2.4M / mm² | 236 Watts | 622.1 GFLOPS |
| Q4 2010 | GTX 580 | 40 nm | 5.8M / mm² | 244 Watts | 1.581 TFLOPS |
| Q2 2013 | GTX 780 | 28 nm | 12.6M / mm² | 250 Watts | 4.156 TFLOPS |
| Q2 2016 | GTX 1080 | 16 nm | 22.9M / mm² | 180 Watts | 8.873 TFLOPS |
| Q3 2018 | RTX 2080 | 12 nm | 25.0M / mm² | 215 Watts | 10.07 TFLOPS |
| Q3 2020 | RTX 3080 | 8 nm | 45.1M / mm² | 320 Watts | 29.77 TFLOPS |
| Q3 2022 | RTX 4080 | 5 nm | 121.1M / mm² | 320 Watts | 48.74 TFLOPS |
| Q1 2025* | RTX 5080 | 4 nm | 120.6M / mm² | 360 Watts | 56.28 TFLOPS |
How can silicone oil based TIM be expected to perform adequately across 20 years of chip advancement?
Of course, incremental advances have also been made in thermal paste technology over that same time. An interesting and unique read on Igor’s lab shows what 20 year Arctic Cooling Silicone Paste is made of and how it stacks up against a mid-tier modern TIM (Alphacool Apex).
With increased thermal conductivity using aluminum and zinc oxide blends, better chemical stability, and higher resistance to pumping, modern pastes have generally satisfied the consumer electronic market until recently.
A variety of newer, high power density applications are pushing traditional paste TIMs to the limit. Small and high performance electronics such as gaming laptops, consoles, and cutting edge video cards are all beginning to adopt factory applied liquid metal TIM for direct die CPU and GPU cooling. These are applications where ICs run at particularly high sustained temperatures and experiences numerous, rapid heating cycles in a physically compact footprint.
One of the most mainstream uses of liquid metal was with Sony’s Playstation 5 console, launched in 2020:

Another upcoming, mainstream use of liquid metal will be Nvidia’s 50 series RTX GPUs. In an interview with Gamers Nexus, Nvidia engineer Malcolm Gutenberg discusses thermal, containment, and longevity concerns with regard to liquid metal use and its benefits for high power density, OEM “Founders Edition” cards.
I’ll be honest; I had zero interest in fooling around with liquid metal until I had a good reason to do so. That good reason came when I bought a newer gaming laptop during Cyber Monday 2024.
The machine is an Acer Predator Helios 18 (PH18-72-93VM), which comes equipped with an Intel 14900HX and Nvidia RTX 4080 mobile GPU. This CPU/GPU combo has TDPs of 55 and 175 watts, respectively. That’s a lot of heat being generated in a small package.
To address the thermal challenge that is Raptor lake, Acer opted to use liquid metal for the CPU TIM.
Unfortunately, I observed that the CPU was running around 70-80°C while the system was idle. This prompted me to play around with Smokeless EFI patcher (factory BIOS provides no tuning ability) after discovering this Reddit thread with a lot of useful info for undervolting the PH18-72-93VM specifically.

Here is a PDF in case the link above dies:
Undervolting to 1.400 volts on the 14900HX helped shave off about 10°C on average without major compromise (as the system was still thermally limited). However, the hotspot delta between cores was still very large (20-25°C), indicating that the liquid metal was not applied well from factory.
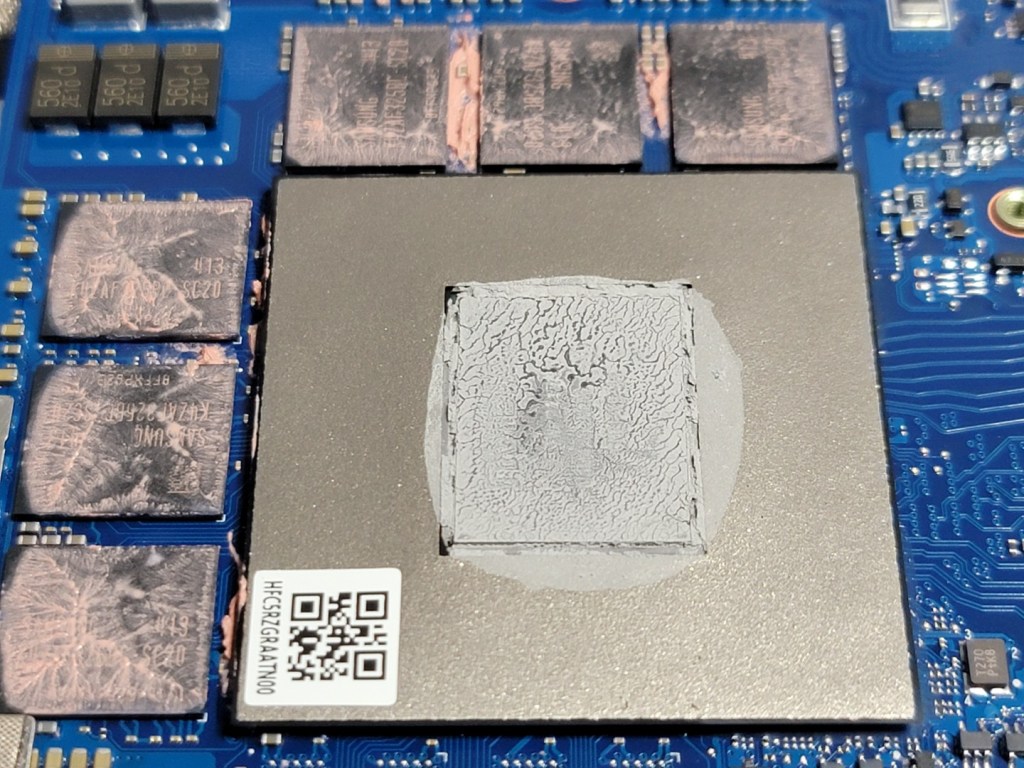
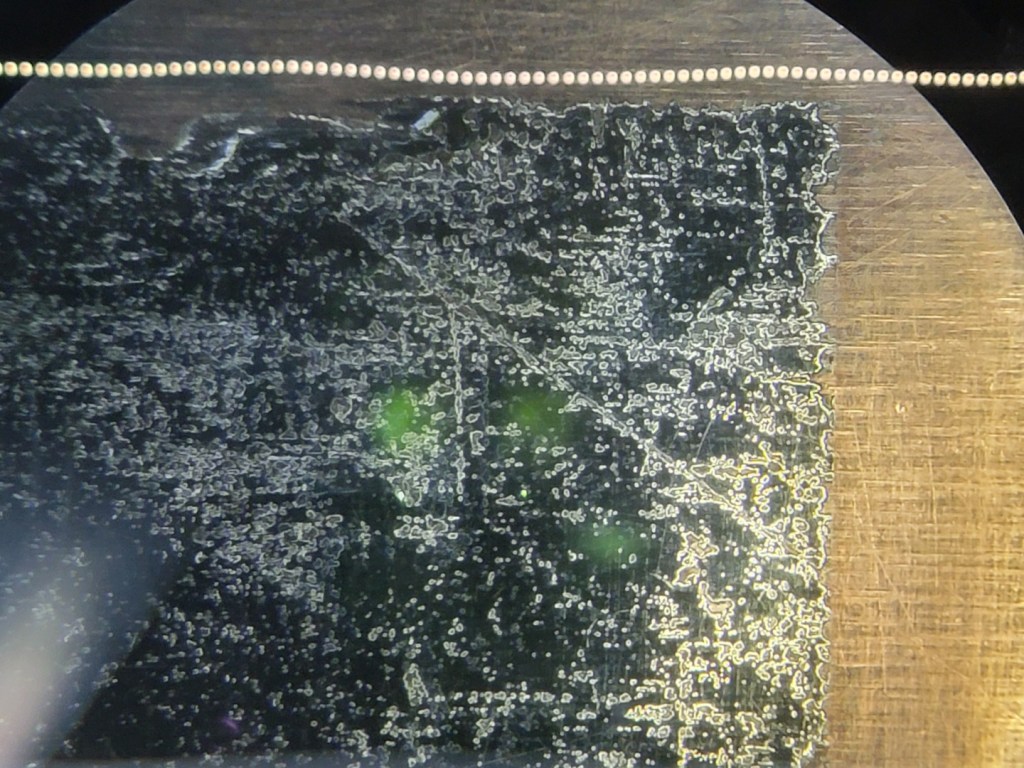
Further research indicated that factory liquid metal applications can be hit or miss. Dry spots such as this are not uncommon:
I had three choices; open a warranty claim with Acer, exchange for a different machine at the big box store, or tackle the problem myself.
Well, I’m not afraid to work on electronics. After watching a few liquid metal specific videos on handling, cleanup, and application best practices, I felt that I was ready to tackle the job.
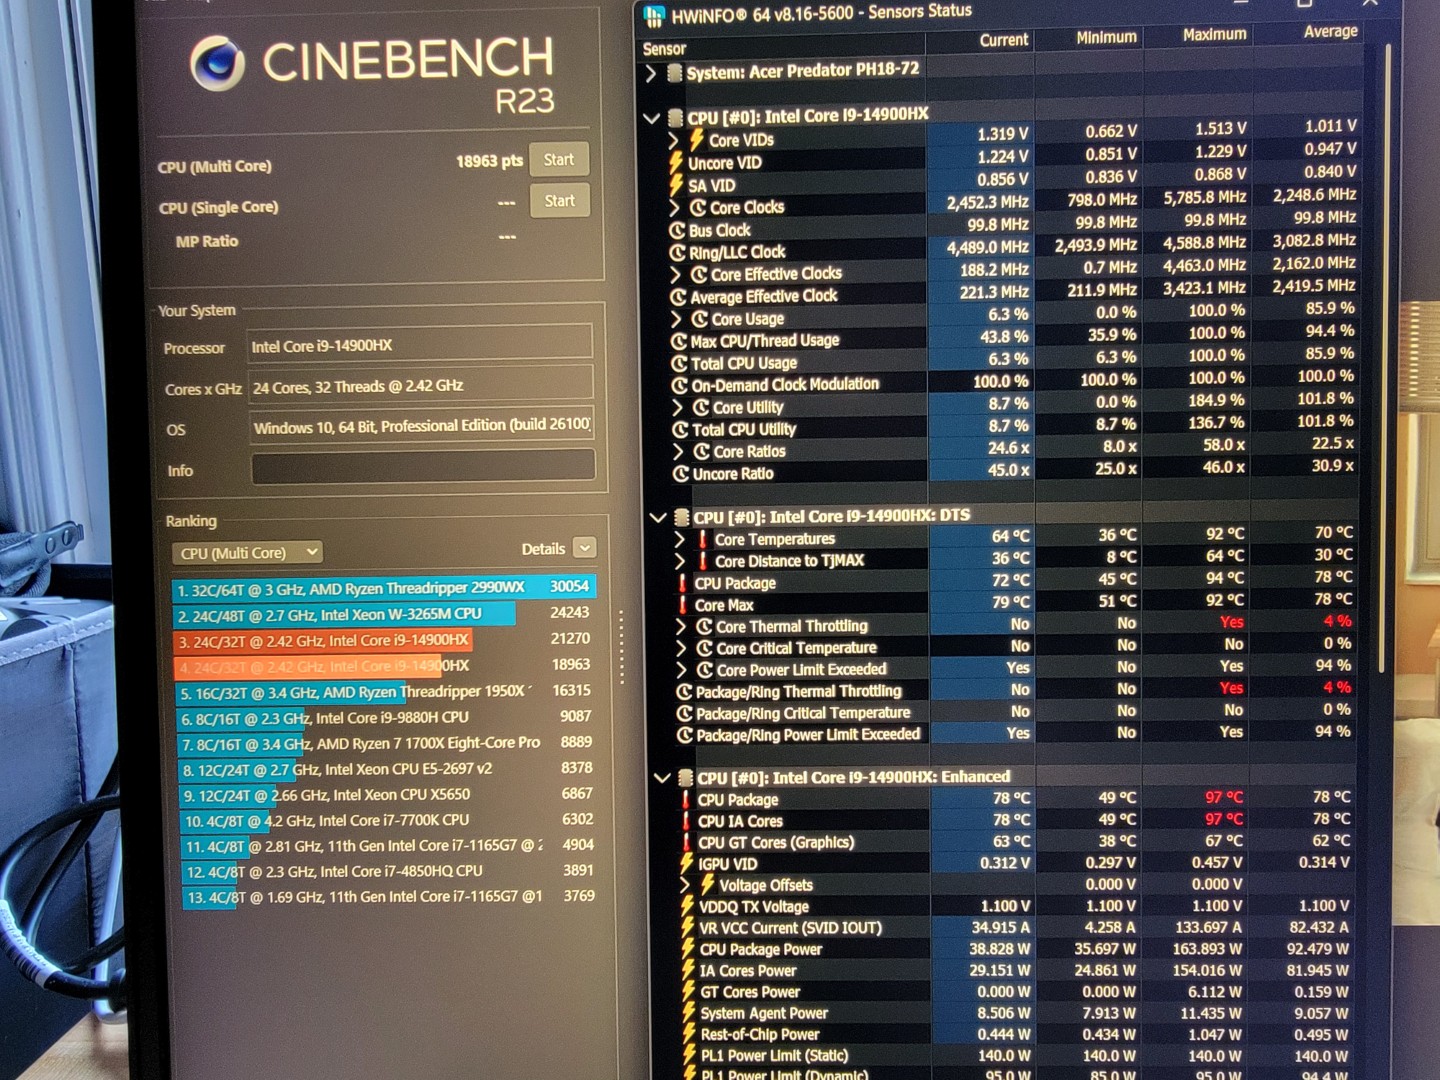
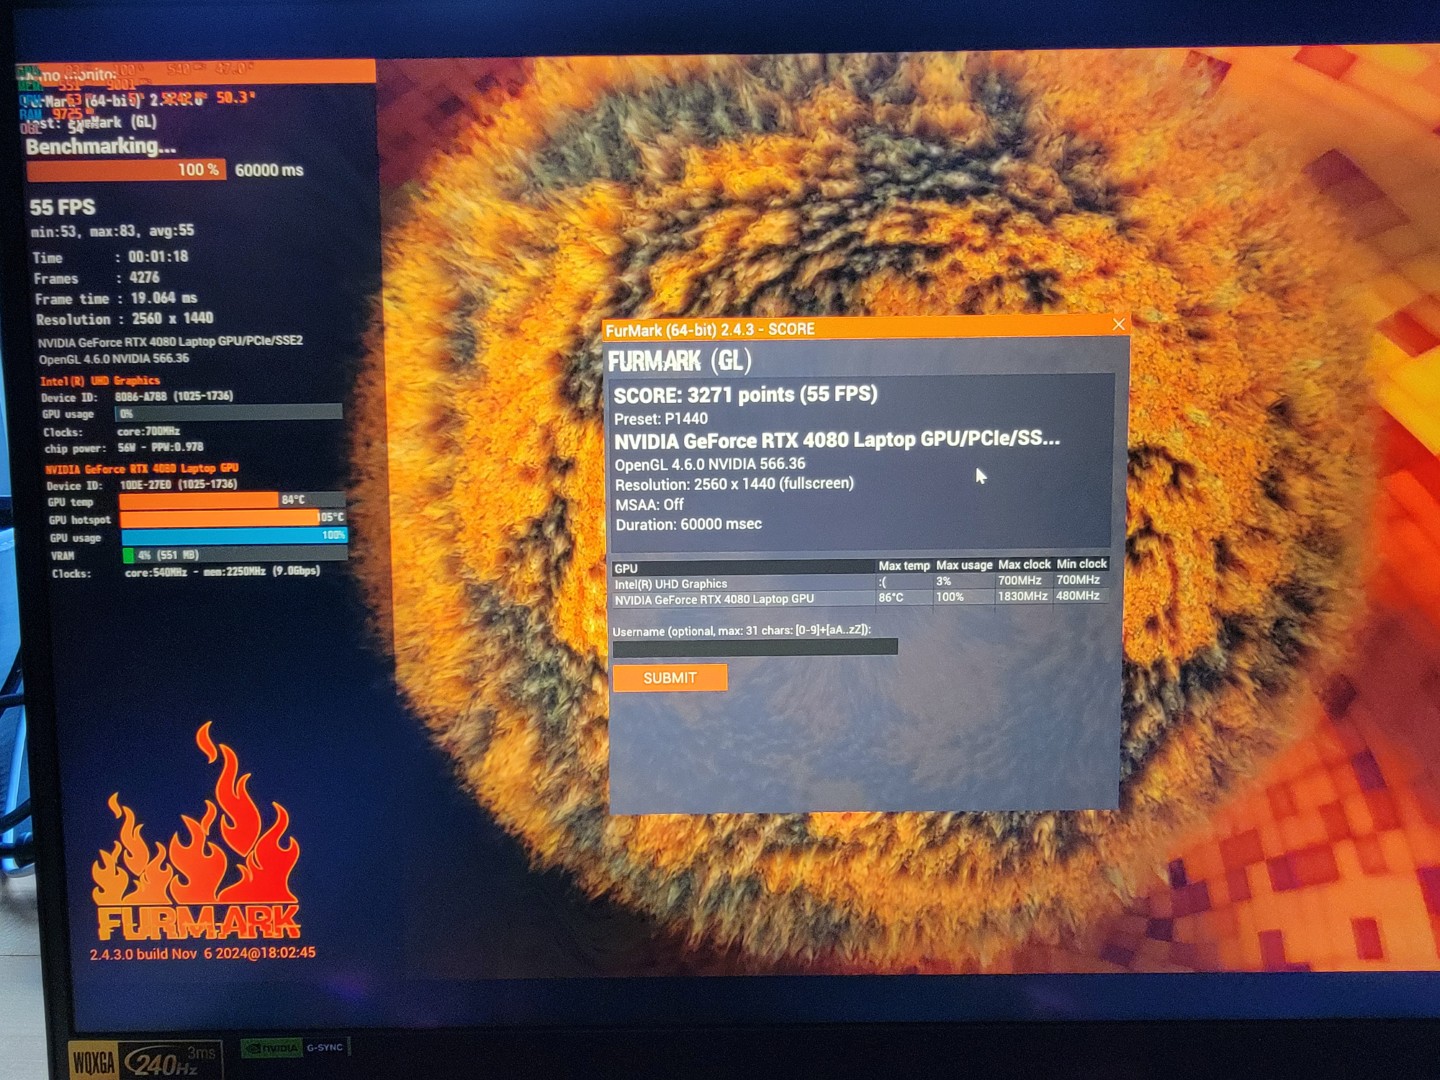
Before opening the unit up, I ran two benchmarks to gauge CPU and GPU thermal performance limits.
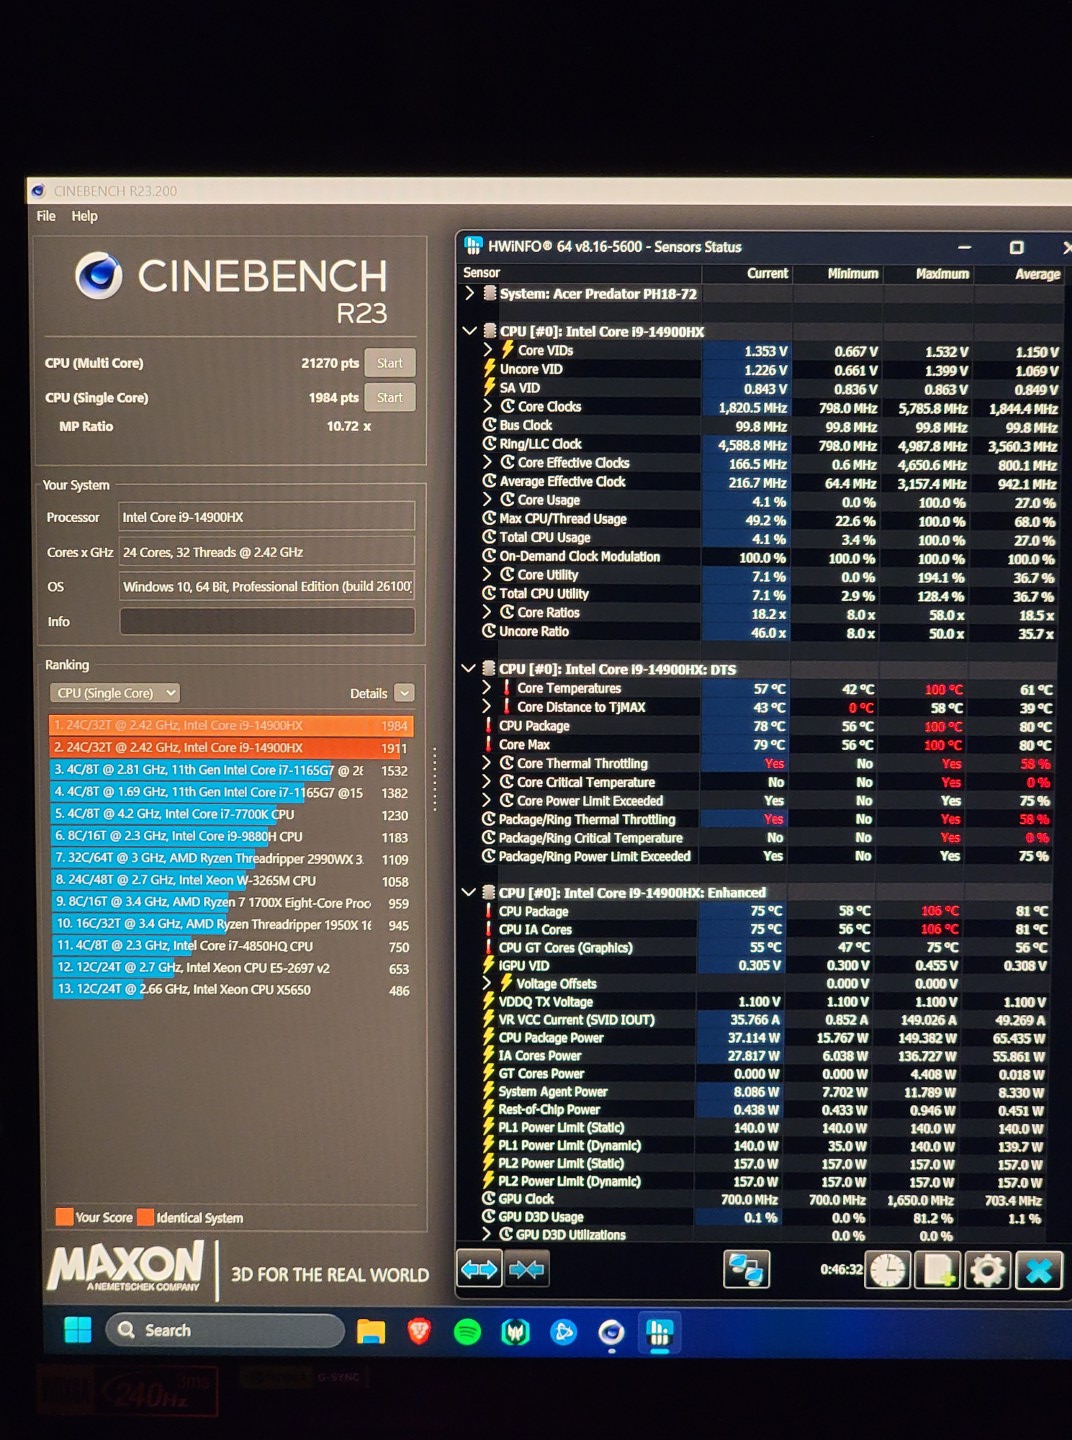

With 58% core thermal throttling, it is clear that the 14900HX is slamming into its thermal limit very frequently. The RTX 4080 seemed to be performing better, achieving its 175 watt TDP with core and hotspot temps within reason.
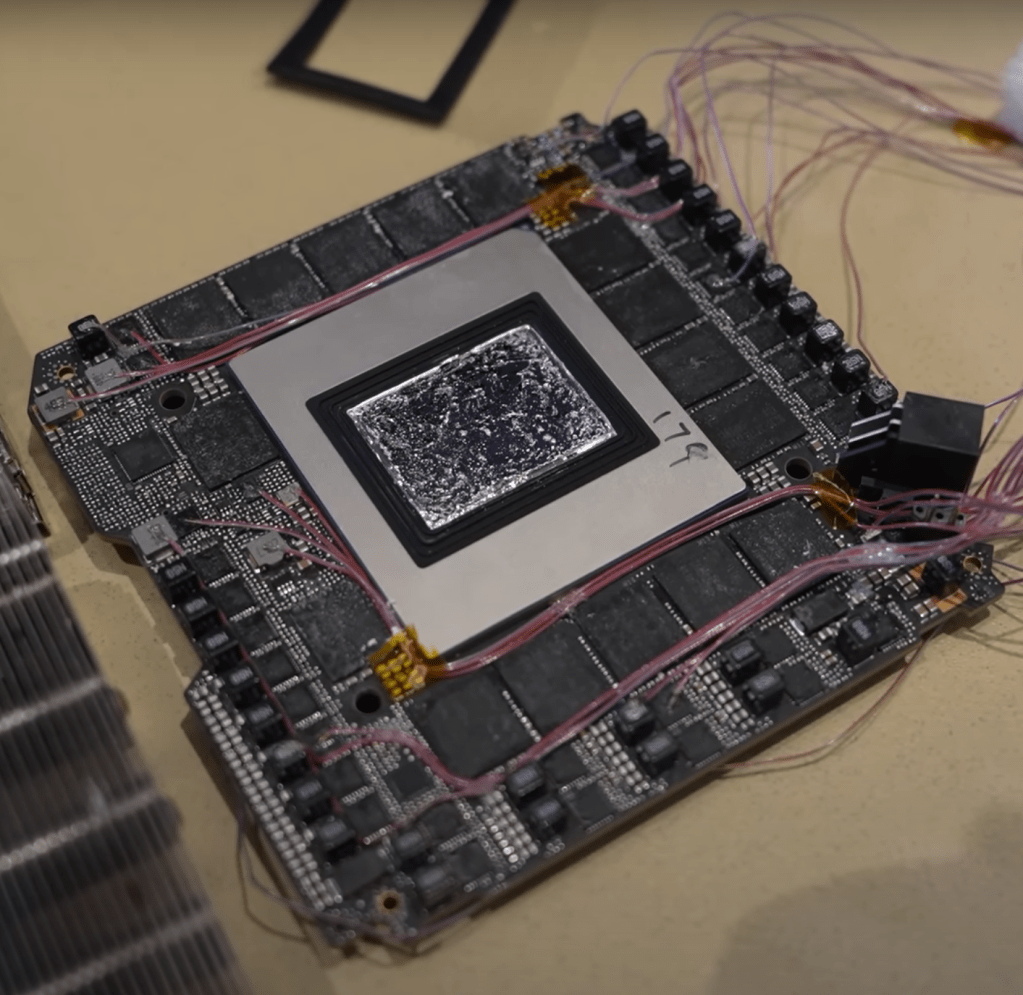
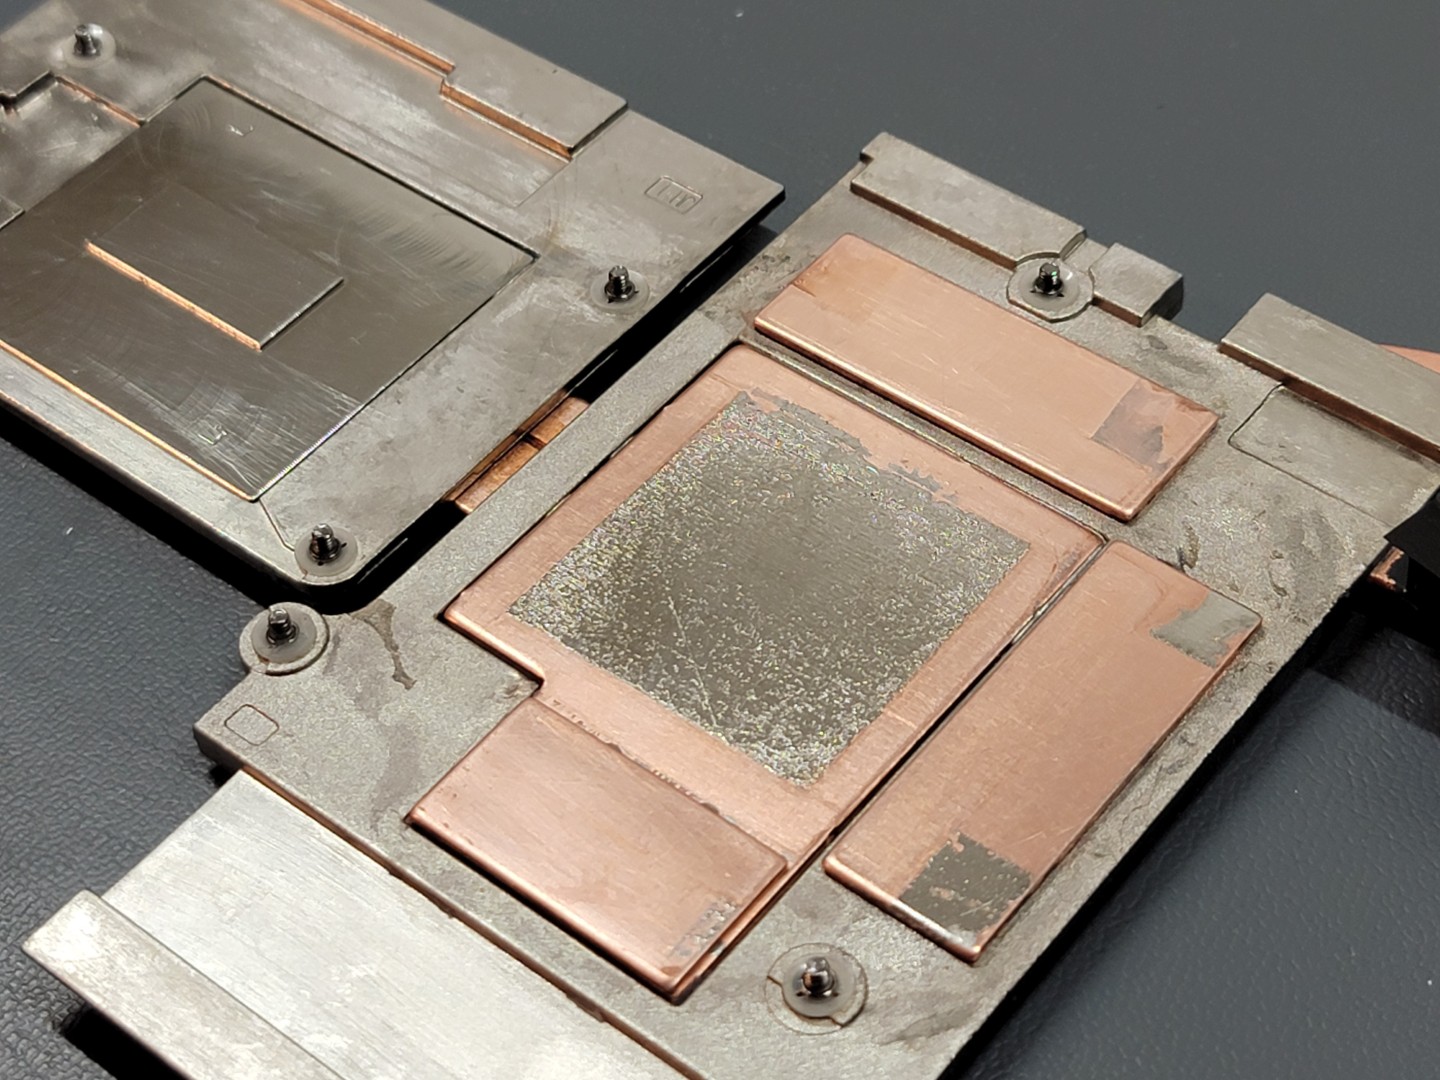
Let’s get this behemoth opened up:
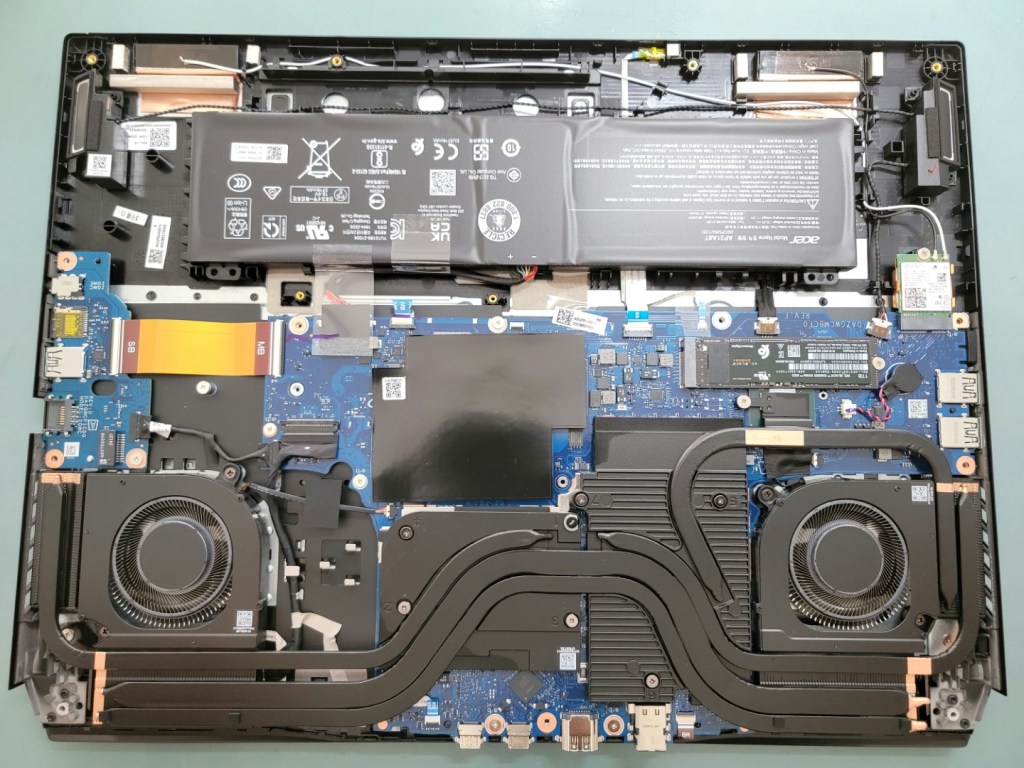

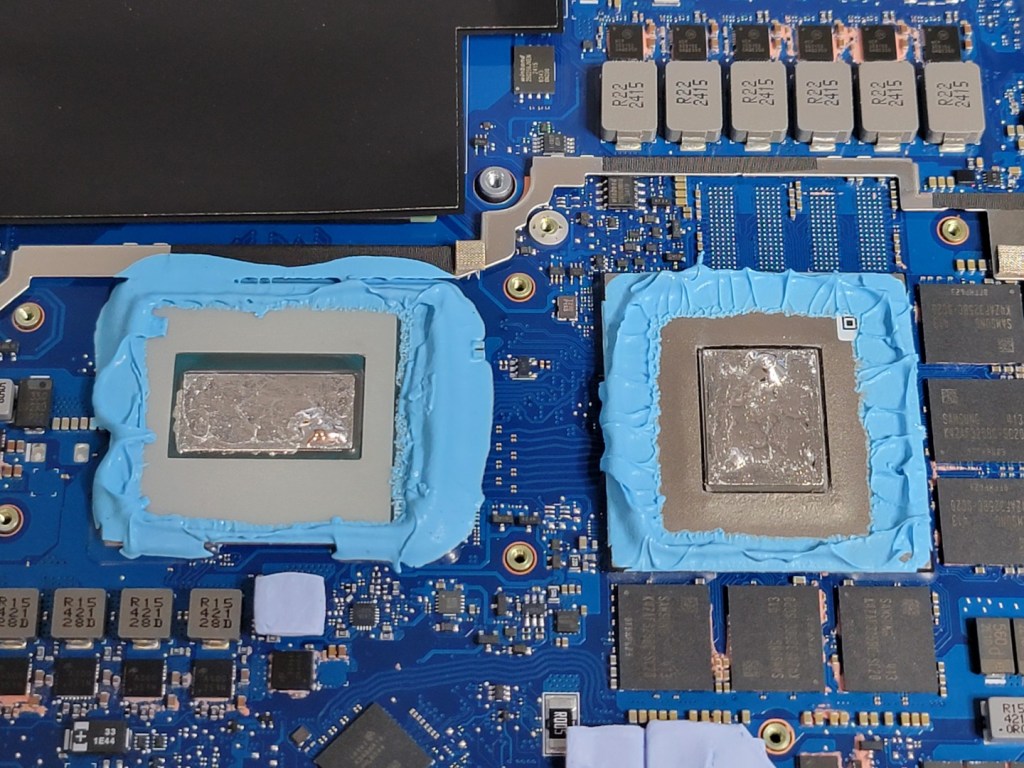
Getting a closer look at the CPU, its clear that we have a liquid metal dry spot on this brand new machine. A plausible explanation for poor idle temps, large hotspot gradient, and heavy throttling.

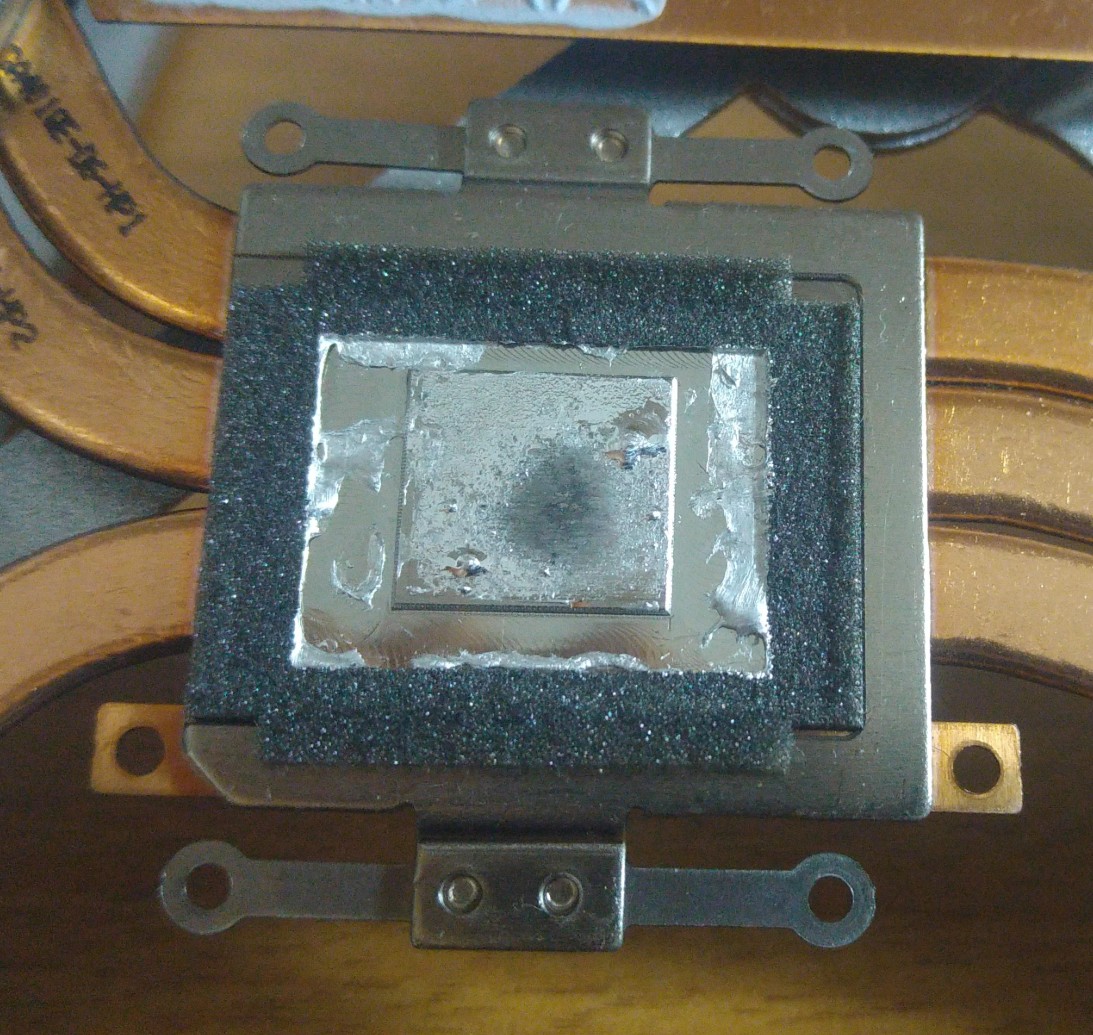
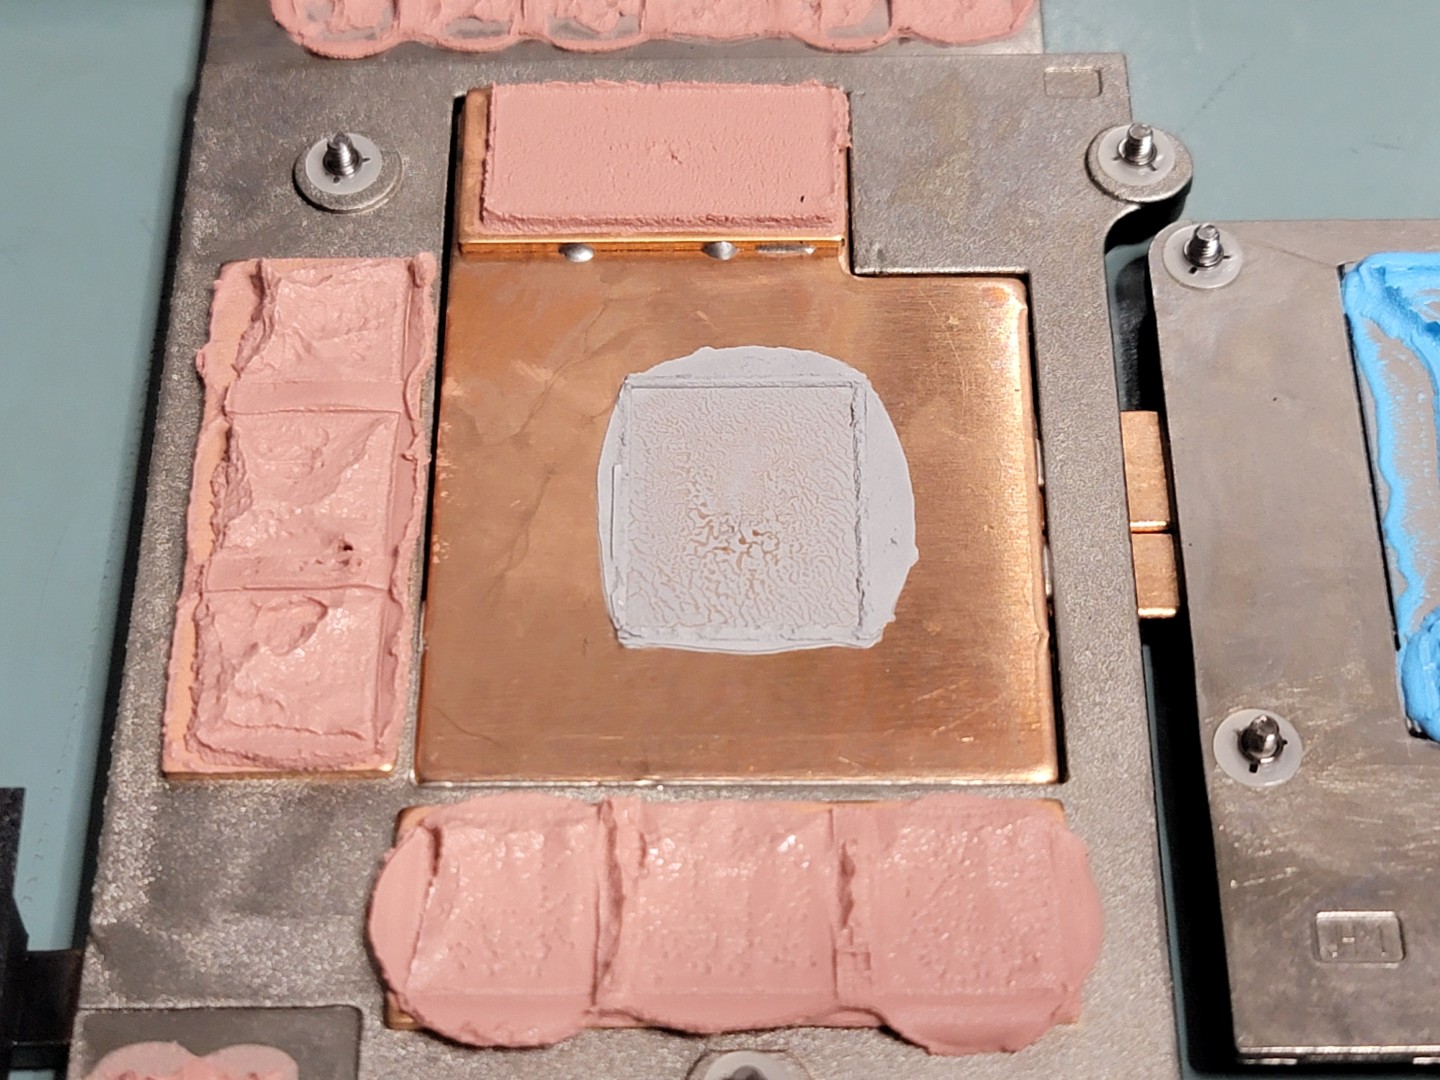
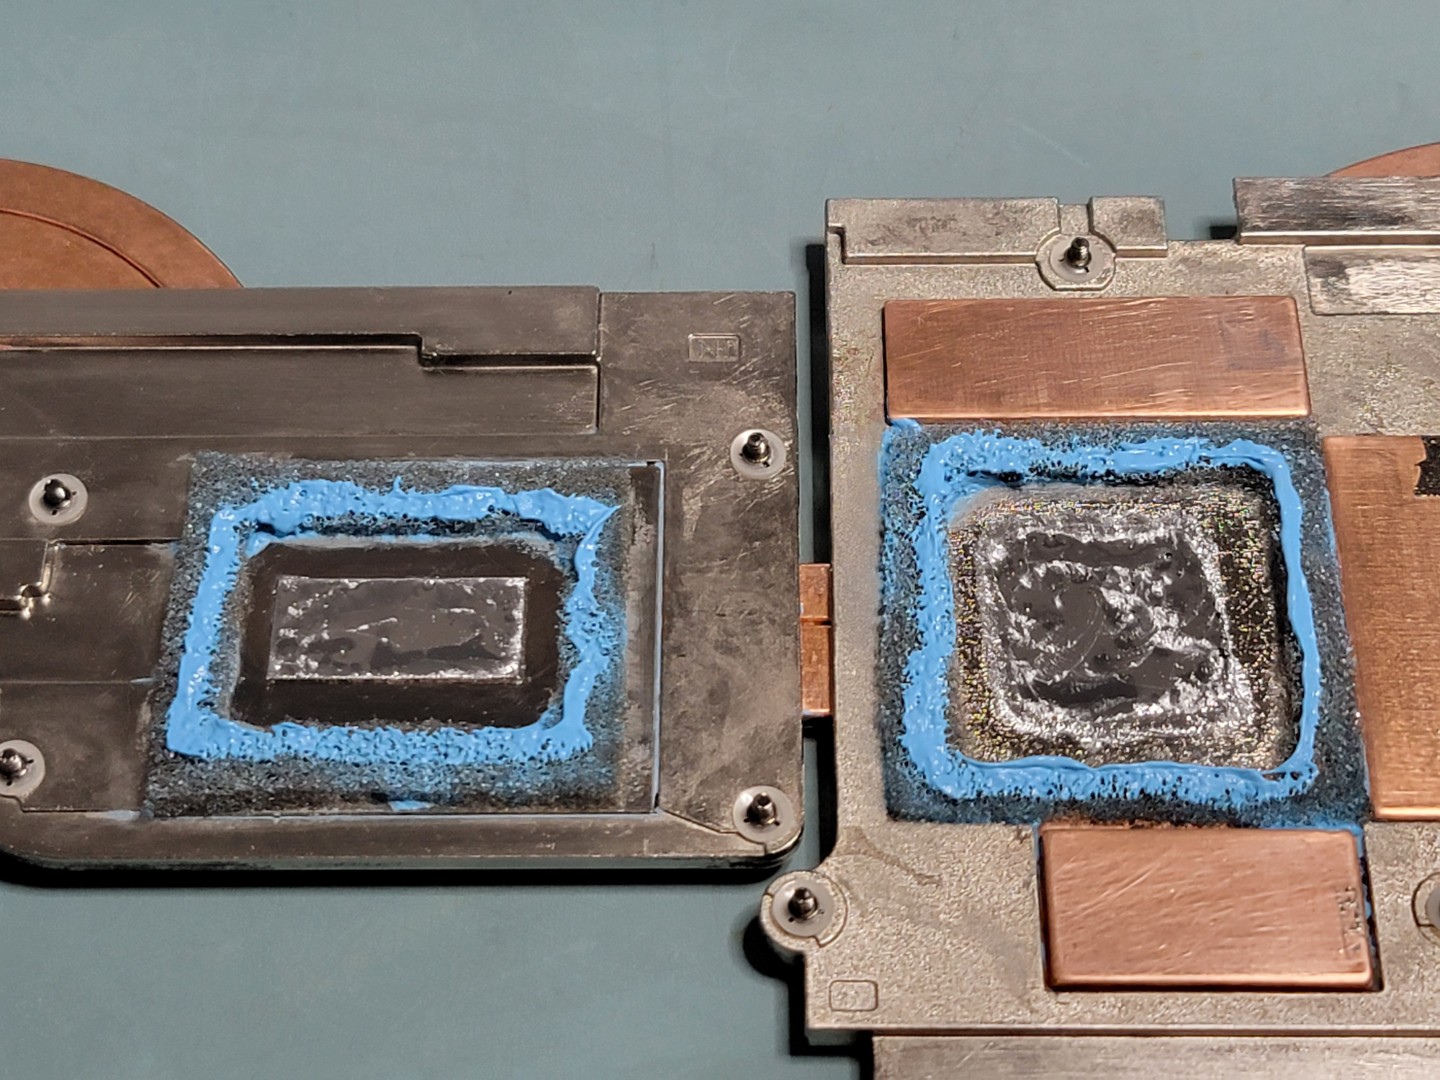
Corresponding dry spot on the CPU heatsink:

The GPU uses traditional thermal paste, which seems to have good coverage.
Now, I could just smear the liquid metal around, put some fresh thermal paste on the GPU, and slap it back together. But that would be too easy…
If liquid metal is the way to go on the CPU, maybe the GPU could benefit from it too?
Only problem is that the copper cold plate for the GPU is not nickel plated. Putting liquid metal directly on copper will cause it to alloy and dry out quickly, necessitating multiple re-applications.
That’s when I had a crazy idea. I have a Caswell electroless nickel plating kit sitting around in my garage from another project…
Some Excel “napkin calculations” show that a reasonable bath size could be used to plate a small square area (1.5″ square) of copper:

Unlike simpler electroplating (which uses DC current to attract metal ions to the plated surface), electroless plating involves an autocatalytic (self-sustaining) reaction that occurs when the plating solution and surfaces are at high temperature (around 90°C).
The challenge becomes: how do I contain the plating bath around the GPU heatsink, and apply enough heat to the heatsink and solution to sustain plating?
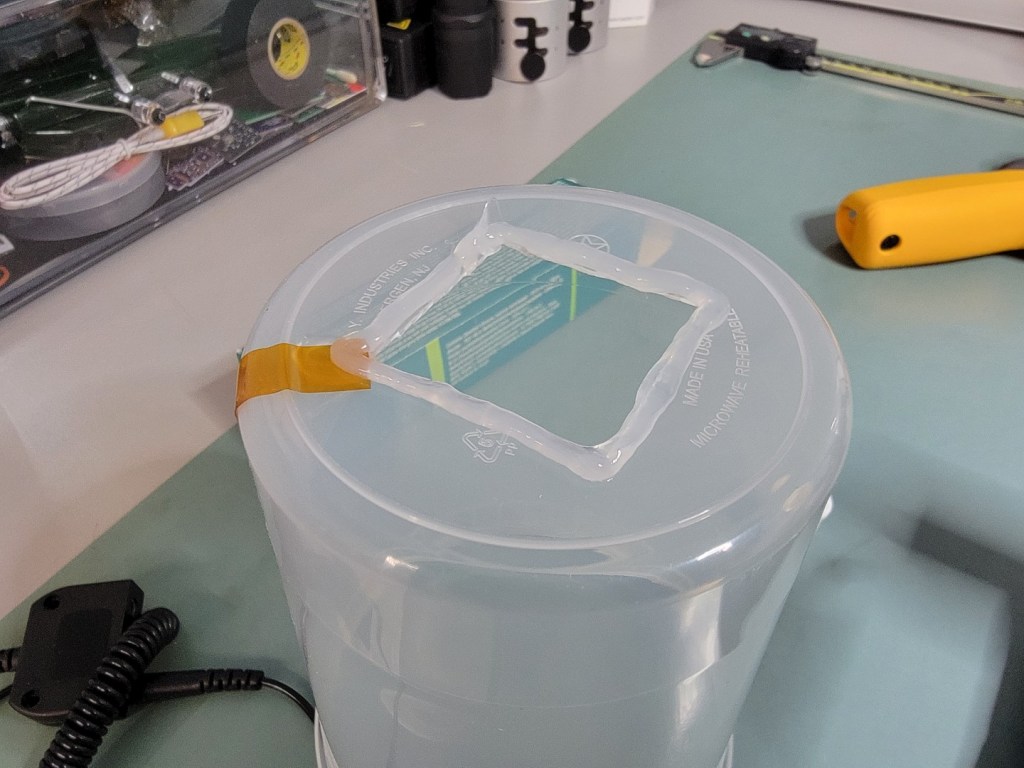
After testing some polypropylene takeout containers, I found that containing boiling water was no issue (PP melting point is stated to be around 160°C).
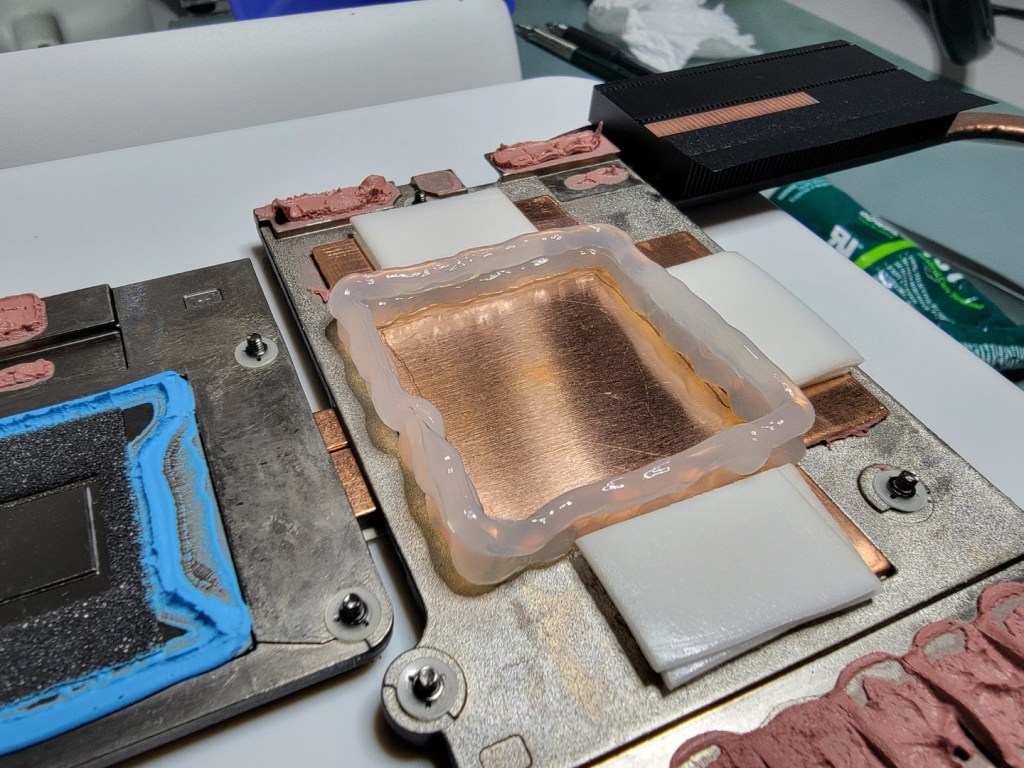
To keep it simple, my plan was as follows: cut a square hole in the container and fasten it to the heatsink with double sided adhesive (3M VHB). Use a good quality neutral cure RTV silicon (Dow 737) to seal the square cutout.
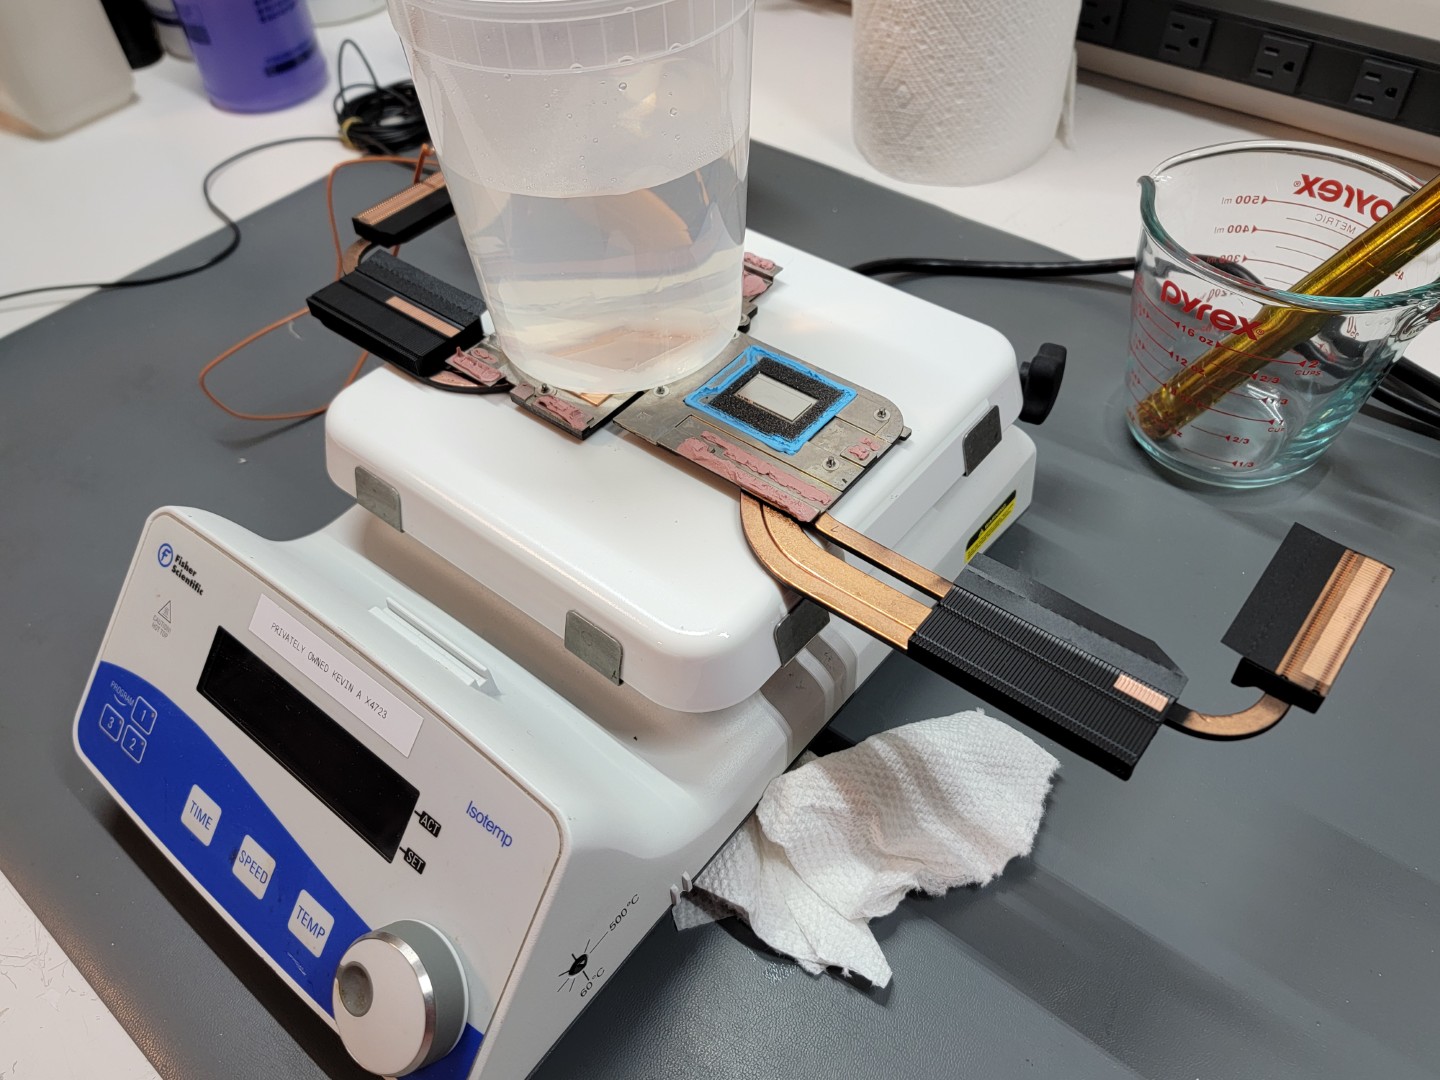
Once the container is temporarily bonded to the heatsink, I will place the heatsink on my hot plate with some thermal TIM to improve heat transfer (I had a tube of Noctua NT-H1 laying around, so I squirted that on the hotplate).
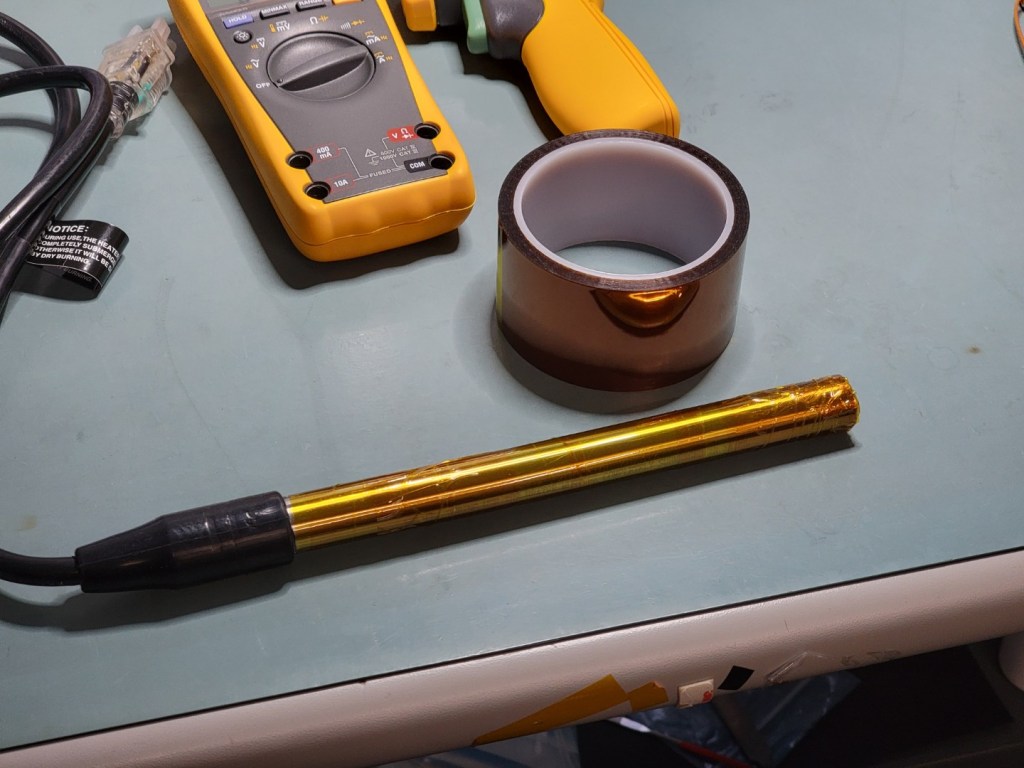
I wasn’t sure if the hot plate would have enough heat transfer to keep the entire electroless bath near 90°C. I looked around for submersible heaters and found a 1500 watt, 120 volt heater on Amazon. I wrapped the stainless heater body tightly with kapton to keep it out of direct contact with the plating solution.
Before we add 4 ounces of plating chemicals, its a good idea to heat the remaining 16 ounces of DI water to operating temp and make sure we don’t spring any serious leaks.
After plugging up a small leak or two, I was able to get the bath stable at 80°C, with the heatsink at 90°C.
Time to add the electroless nickel solution and go for it!
I didn’t have a ring stand, so I stood at the bench for 1 hour and 30 minutes, stirring the solution with the submersible heater. I replenished the bath according to my calculations at 40 minute intervals, to ensure it does not “crash” (which will happen if nickel content in solution drops below 80%).
Based on the plating time, we should have a thickness of around 0.0015″ (38.1 µm).
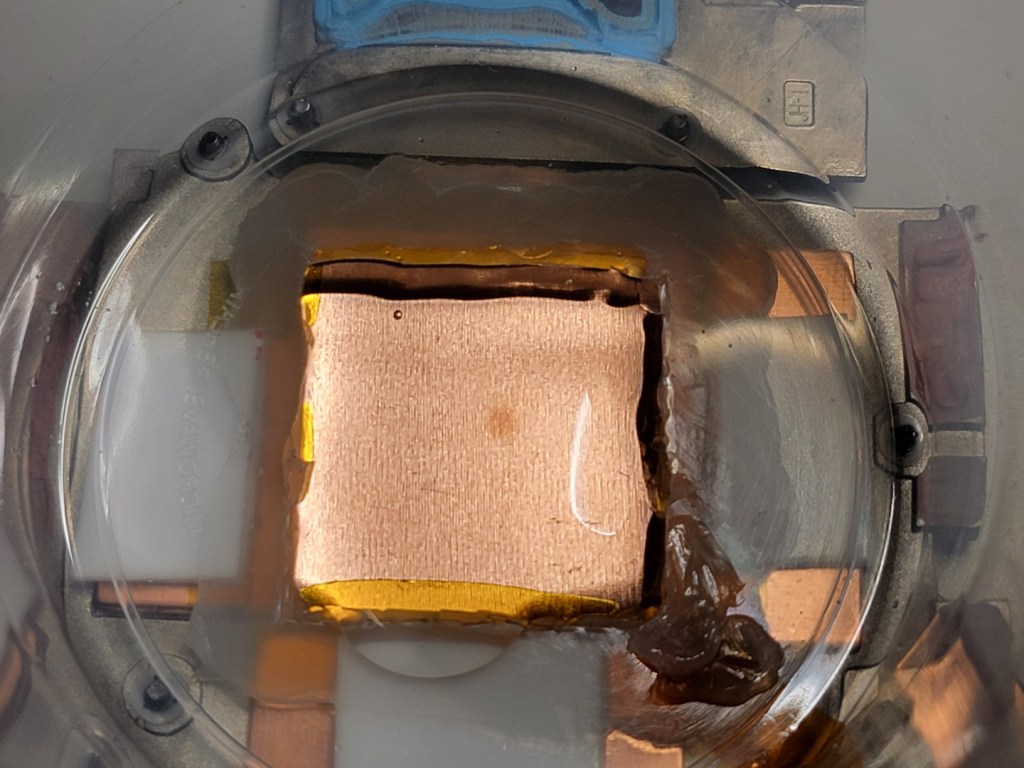
The final result, after a bit of cleaning to remove RTV and tape:
Some of the plating solution did leak onto the memory heatsinks, so we have small patches of plating which are fairly inconsequential.
One observation was that the plating surface is a bit rougher than I would’ve liked. Towards the edges, it is more pronounced:
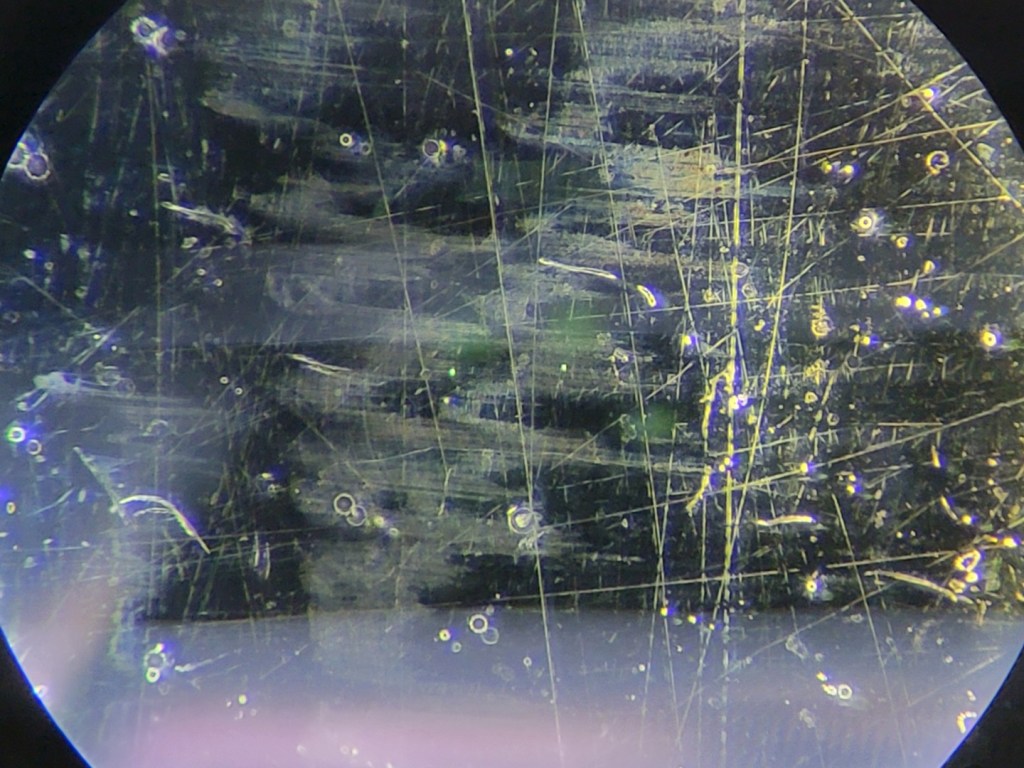
I’m not sure what the root cause of the edge roughness is. It could have been caused by hydrogen bubbles trapped on the plating surface, or possible contaminants in the plating solution. I had to dispense with my perfectionism and accept this outcome as the best I could do quickly and at home.
Now, onto prepping for new liquid metal. The go-to method for sealing liquid metal seems a combination of ultra soft, open cell foam and silicone putty. The sometimes foam-only is used, but I feel that viscous putty can also create a better barrier to prevent oxidation of the liquid metal over time.
I found some generic open cell foam I had laying around, and carefully cut it to size with a filet knife and an xacto knife.

For the silicone putty, I looked around for a high-viscosity one. The putty must stay in place, even under high operating temperatures. I eventually found this on Digikey: LiPOLY S-Putty. It seems to have higher than average viscosity, while being a thermally conductive and electrically nonconductive putty.
As far as liquid metal selection, I opted for the recently released Thermal Grizzly Conductonaut Extreme. It is marketed as having increased thermal conductivity and material compatibility versus older liquid metal formulas. The datasheet indicates that Conductonaut Extreme does away with Tin, meaning that it is composed only of gallium and indium. For reference, the thermal conductivities of Gallium, Indium and Tin are approximately 40, 82, and 67 W/mK, respectively.
To prep the motherboard, I cut the Arctic TP-3 pads to size and placed them appropriately.

In order to seal the immediate area of the GPU die, I also applied a tiny amount of Dowsil 737 around the die perimeter. The GPU has some sort of cover over most of the BGA substrate, but I wasn’t sure if the die perimeter was liquid-proof. Better safe than sorry.
Prepping the heatsink, I tried using Nitto P-02 tape to glue the foam down first (the original CPU foam was also adhesive-backed). Then I applied S-Putty along the perimeter.
I then buttered up the GPU and CPU dies with new liquid metal, as well as the heatsink contact areas.

After reassembling, I re-ran my benchmarks to find that something wasn’t quite right:
While the CPU score dropped only marginally (and so did the throttling), the GPU was severely thermally throttled and performed terribly. Can’t expect perfection on the first try… back in we go:

It’s pretty obvious that I used WAY too much S-Putty. This stuff is quite viscous, and laptop heatsinks are already known for their abysmal mounting pressure. I was sure that the GPU (and also CPU) die did not have good mounting pressure due to the thick putty.
I cleaned everything up, made new foam gaskets (with more pullback around the die), put down new pads, and got ready for the second try. I also eliminated the Nitto P-02 tape as well; the putty is sticky enough to hold the foam until it is compressed. The less material reducing mounting pressure, the better.

I also heated up the S-Putty to about 60°C to make application easier. I applied warm S-Putty along the perimeter of the foam itself; when compressed it should further impregnate the foam and create an airtight barrier.
After closing up and running benchmarks again:

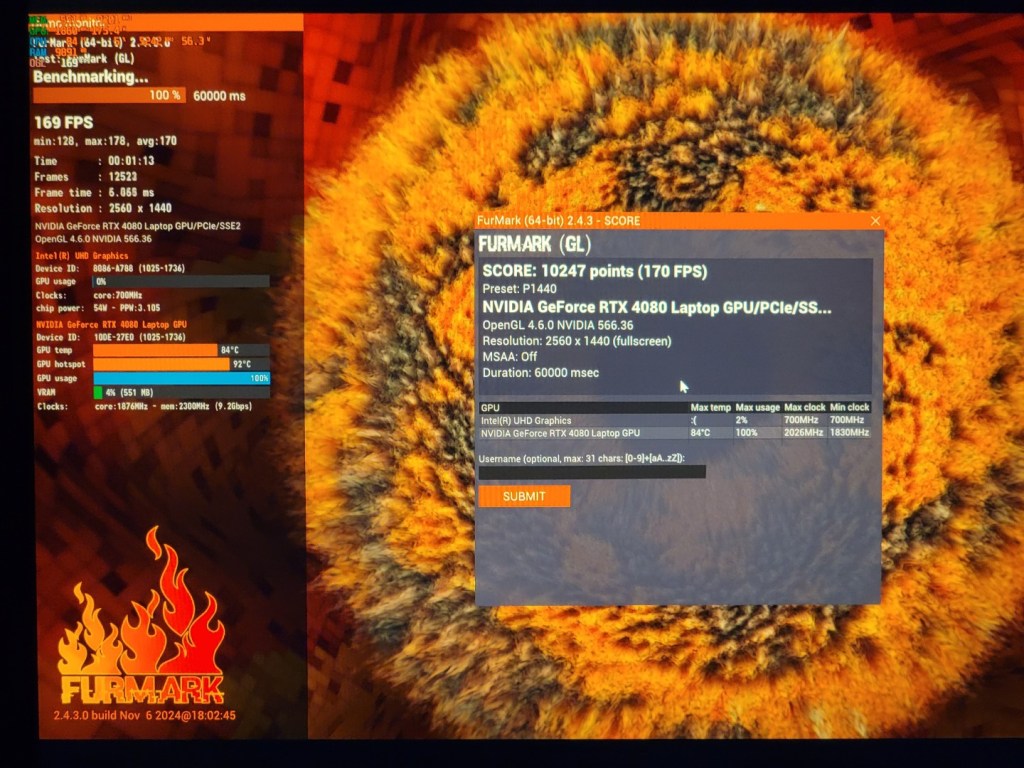
That’s more like it. While overall CPU score didn’t improve drastically, the hotspot gradient and thermal throttling percentage was significant reduced. Idle temperatures are also around 55°C, which is much better than the 70-80°C that we started with.
The GPU is exactly the same as when we started; it was already achieving the full 175 watt power rating, so I suppose there wasn’t more performance to be gained by improving the TIM. Hopefully, the benefit of this carefully prepared liquid metal application will be longevity; where the original paste would have pumped out and/or dried, the liquid metal will last much longer.
In summary, was it worth all of the effort I went through? Probably not.
Unless you are comfortable with using liquid metal and voiding your warranty, I would not recommend the average PC gamer/builder mess around to this extent.

If you want uncompromising notebook performance, just get a system like the XMG Neo 17 which comes from the factory with liquid metal applied to both CPU and GPU (for the RTX 4080/4090 config), and has built-in liquid cooling features to overcome notebook air cooling limits.
As far as the Predator Helios 18 goes, CPU tuning optimizations and improving factory TIM application should help get the most out of this machine now and in the future.
Plus, we did do some learning about thermal challenges and solutions in the modern computing world… and more knowledge is always welcome.
